Sunday, May 2, 2010

Rhubarb Recipes (or What do I do with all of this Rhubarb?!)

Rhubarb is in season in the beautiful mountains of West Virginia. It is one of the first crops that comes into season for us, so we always look forward to this time of year. Many Americans have never seen or tasted rhubarb because it is not widely available in the grocery. Essentially, it is a perennial that grows on a red and green stalk and looks similar to giant celery stalks. It has a bitter taste that is a nice complement to strawberries and other sweets. The rhubarb we use is a wonderful heirloom variety that is very old and has been growing for decades.


If you would like to try rhubarb but do not know what to do with it, our compilation of recipes is listed below (credit is given where credit is due).

Danish Rhubarb Liqueur from How To Make Danish Liqueur by Cheryl Long. (We were lucky enough to stumble across this recipe on the Throwback at Trapper Creek blog which also contains many other great rhubarb recipes).

4 cups fresh rhubarb, sliced
4 cups granulated sugar
3 cups vodka

Slice rhubard in 1/4 inch slices and combine with sugar in a large jar, glass bowl, or crock. Pour vodka over and stir well with a wooden spoon. Cap or cover and let sit 2-4 weeks. The color will turn rosy. Stir once or twice.

Strain off liqueur using a colander over a large bowl. Discard rhubarb. Strain through triple cheesecloth. Poor into bottles and cap. Let age at least 1 month. For a more mellow flavor, age 3-6 months. Makes 2 qts.


Ruby Port and Rhubarb Risotto with Sugared Strawberries (courtesy of Cooking Light magazine, May 2010, p. 196)

2 cups sliced strawberries
3/4 cup plus 1 Tbsp sugar, divided
2/3 cup ruby port
1 1/2 cups chopped rhubarb
3 1/2 cups water, divided
2 cups whole milk
1/4 tsp salt
1/8 tsp freshly ground nutmeg
2 Tbsp butter
1 cup uncooked medium grain rice
1/2 tsp vanilla extract
1/4 (2 oz) mascarpone cheese

Combine strawberries and 1 Tabsp sugar in a small bowl. Set aside.

Combine port and 1/4 cup sugar in a small saucepan over medium-high heat. Bring to a boil. Cook 7 minutes or until slightly thickened. Stir in rhubarb. Cook 7 minutes.

Bring 3 1/2 cups water to a simmer in a small saucepan (Don't boil). Keep warm over low heat. Combine milk, remaining 1/2 cup sugar, salt, and nutmeg in a separate saucepan; bring to a simmer. Keep warm over low heat. Melt butter in a large Dutch oven. Add rice to pan; cook 1 minute, stirring constantly. Stir in 1 cup hot water; cook 3 minutes or until liquid is nearly absorbed, stirring constantly. Add remaining water, 1/2 cup at a time, stirring constantly until each portion of water is absorbed before adding the next. Add milk mixture, 1/2 cup at a time, stirring constantly until each portion of milk is absorbed before adding the next (about 30 minutes total). Stir in vanilla; cook 1 minute. Remove from heat; stir in mascarpone until cheese melts. Place about 1/2 cut risotto in each of 8 bowls. Top each serving with 2 Tbsp port mixture and 1/4 cup strawberry mixture. Yields 8 servings.


Strawberry Rhubarb Ice Cream (courtesy of Cooking Light magazine, May 2010, p. 116)

2 1/2 cups whole milk
3/4 cup half and half
1 cup sugar, divided
3 large egg yolks
2 cups chopped fresh rhubarb
1/3 cup fruity red wine (or substitute cranberry juice cocktail)
3 cups chopped fresh strawberries

Combine milk and half and half in a heavy saucepan over medium-high heat. Heat milk mixture to 180 degrees or until tiny bubbles form around edge (don't boil). Combine 1/2 cup sugar and egg yolks in a large bowl, stirring with a whisk until pale yellow. Gradually add half of hot milk mixture to egg yolk mixture, stirring constantly with a whisk. Pour the egg yolk mixture into pan with remaining milk mixture; cook over medium-low heat until a thermometer registers 160 degrees, stirring constantly. Place pan in a large ice-filled bowl for 20 minutes or until custard cooks completely, stirring occasionally.

Combine remaining 1/2 cup sugar, rhubarb, and wine in a saucepan over medium-high heat; bring to a boil. Reduce heat, and simmer 8 minutes or until rhubarb is tender and liquid is syrupy. Remove from heat; let stand 10 minutes. Combine rhubarb mixture and strawberries in a blender; process until smooth. Strain mixture through a sieve over a bowl, pressing with a wooden spoon; discard solids. Stir rhubarb mixture into custard mixture.

Pour custard into the freezer can of an ice cream freezer; freeze according to manufacturer's instructions. Drain ice water from freezer bucket; repack with salt and ice. Cover with kitchen towels, and let stand 1 hour or until firm. Yields 10 3/4 cup servings.


Organic Insecticide
Rhubarb leaves can be used to make an effective organic insecticide for any of the leaf eating insects (cabbage caterpillars, aphids, peach and cherry slugs, etc).

Shred 3 lbs rhubarb leaves.

Boil in 1 gallon of water for 30 minutes.

Strain into a bucket to cool

In a small saucepan heat to boiling point 2.5 quarts of water and mix in 4 oz of softened natural soap ends.

Add to the strained leaf mixture, stir vigorously, and allow to cool.

Pour into a sprayer. I strained it again through a colander to make sure there were no pieces to clog the sprayer. Spray onto desired plants. Any unused spray should be used within a day or two.

Tuesday, April 27, 2010

Eggs are my Currency

Today, I traded a friend 3 dozen eggs for a large bale of mulch hay.
Tomorrow, I'm going to another friend's farm to pick rhubarb. She has a huge "community" patch of rhubarb and she lets me pick all I want. In return, I'll give her several dozen eggs. I love bartering for goods and services. Usually, my currency of trade is a dozen eggs. I've traded eggs for a bale of hay, fresh garden veges, wild mushrooms, a little help moving a dresser, or just about anything else. We have 2 friends who help us clean the lodge after guests leave. They get paid and also get a gift of a dozen eggs.

Sometimes, we get homemade jam or hot sauce from a friend. They get a dozen eggs in return. If I'm baking bread at the time, they might get a loaf of bread instead. But, normally, we give a dozen eggs. It's a good that we have in abundance and readily available. Besides, everybody likes farm fresh eggs.

It's fun trading and bartering with friends. It lends to my feeling of self-sufficiency by not relying on money. Giving a loaf of bread or a dozen eggs is always a nicer gift than a couple of dollars. I've often helped friends throw hay in the barn or cut some firewood just for a cold drink. Everything doesn't have to rely on the almighty dollar. Now, if I could just get Lowes to take a dozen eggs for a box of screws.

Monday, April 26, 2010

Organic Gardening

This weekend, Liam and I helped Jorene spread compost over her flower beds. We make lots of compost here on the farm. I mix bedding material and manure from the animals with leafs, straw, kitchen scraps, and wood shavings from a sawmill nearby.

The benefits of using organic homemade fertilizers are numerous. First, we are re-using materials on hand that would otherwise be considered waste materials that would clog up the landfills. Additionally, by using a natural fertilizer, we do not contribute to the pollution of our land and waterways through the leaching of chemical fertilizers into the ground. Finally, natural fertilizer is cost effective because it is nearly free and readily available in large amounts, which helps us achieve our overall goal of self-sufficiency on the farm. It also helps reduce our garbage removal bills because we would otherwise have to pay to have it hauled off.


This pile of compost had been aging since last fall. We have a large pile which is turned over with a tractor and bucket a couple of times during the aging process. This allows air and moisture into the pile and gets everything thoroughly mixed.


Here we are, hauling a load of compost up to the flower beds. Liam loves driving the tractor.


Another way we feed our plants naturally, is with manure tea. Manure tea is rich in nutrients, especially nitrogen. It feeds the plants naturally, helps build stronger plants that can fight off disease and pests, and works as a soil amendment. To start, I put a couple of shovel fulls of rabbit manure in a burlap bag.


This gets floated in a 55 gallon barrel for a couple of days. Every time I walk by the barrel, I'll stir the mixture and get some air in the tea.


After the tea has "brewed", the manure bag is removed. It can be spread on the garden or added to the compost pile. The tea is used to water the gardens and is a great source of macro and micro nutrients to our flowers and vegetables.

Friday, April 16, 2010

Jorene's Perennial Gardens-April 2010

Last year, I tried to keep a weekly photo journal of my perennials. I did well until I was called to military duty mid-July. By the time I returned to the lodge in mid-August, it was all I could do to keep the weeds from overtaking the flower beds. (The fact that we had an infant to care for also added to the workload). This year, I hope to do a better job of keeping my photo journal. I'm starting very early this year because we have had an unseasonably hot, dry April with temperatures frequently in the 70s and 80s. It is usually very wet with rain nearly every day and temperatures in the 40s and 50s this time of year. My perennials are sprouting as are the trees on the mountain. They do not usually sprout until mid-May. At the rate the perennials are growing, the full sun beds should be blooming by May followed by the shade beds. However, we could get frost and snow until mid-May, so I am a little worried about the more tender perennials and trees. I have my fingers crossed for rain and above freezing temperatures for the rest of April. Below, are photos of my various perennial beds and their current states. I hope to blog more about the specifics of each perennial bed as the plants in them grow and bloom this year.

These are the two budget garden beds that DH and I built and blogged about last summer. They were covered by snow until very recently, so they are a little behind the other perennial beds. I was worried that the small Itea Virginica Henry shrubs, which are in the back and have yet to get their leaves, would not make it through our harsh winter. We received over 200" of snow here, but they appear to have made it. The only plants in this bed that did not survive were the lily of the valley. Although these are partial-shade beds, they receive too much sun for lily of the valley, and it just fried last year. I have added ajuga, which spreads quickly, to take its place. I will also add more lamb's ear and liriope because we have extra of them this year. That way these beds will fill in faster. All of the plants in these beds require very little care.

This photo is of my naturalized perennial bed. My original idea in 2005 was to plant extra perennials in here and let them grow in a naturalized setting. I almost gave up on the idea because nothing seemed to happen in the first couple of years. However, by 2007, I was starting to see a little progress. Last year was pretty great. It bloomed all season long. There are currently bearded iris, Japanese iris, ox-eye daisies, blue-star, and oriental lilies sprouting. I really can not wait to see how this bed does this year. It is always a fun surprise.

This photo is of our herb garden in the back with a cutting garden in the front and peonies in the foreground. We grow all sorts of perennial and annual herbs, including chives, lemon balm, mint, rosemary, a variety of basils, thyme, oregano, anise hyssop, and marjoram. This year's cutting garden contains a large number of gladiolus bulbs and Japanese iris.

This is our friendship garden because all of the perennials in it have come from dear friends and neighbors. This bed happened by accident. We had some extra perennials and rocks. DH did not want to mow this patch of grass, so he built the low rock wall and threw the dirt in before I had a chance to say otherwise. I added the perennials. I have a love/hate relationship with this bed. I love it because it is, by far, the most spectacular bed we have. It is always in bloom with something beautiful. Also, the colors always seem to flow nicely from one season to the next. However, I hate it because this all happened without ever really trying whereas I have planned and worked so hard with my other perennial beds, which are never up to the caliber of this one.

This is the new shade garden DH and I are constructing. It contains pink, blue, and white perennials, including columbine, bleeding heart, hydrangea, meadow sweet, lamium dead nettle, and foam flower, as well as a large variety of ferns and hostas and a pee gee hydrangea tree that I just planted. I would also like to add a little creek to this perennial bed, but I am pretty sure that, with all of the other activities going on at the lodge right now, it will have to wait until next year.


The above two photos are of my shade gardens in the front of the lodge. They contain purple and yellow perennials, including clematis, black-eyed susan, cardinal flower, woodland violets, Japanese iris, lady's mantle, and coreopsis, as well as a large variety of ferns and hostas.


My two front porch beds contain small boxwoods (which took a complete beating this past winter), day lilies, and hostas.

This front bed contains cannas, day lilies, lamb's ear, and gaillardia goblin.

This is my full-sun front bed, which I am constantly planning and working on. It never seems to look as nice as the other beds nor as I had hoped. In other words, it always fails to meet my expectations. Hopefully, this year will be the year. It currently contains purple, blue, and white perennials, including clematis, spiderwort, blue star, daisies, scabiosa butterfly blue, bearded iris, Japanese iris, lilies, Russian sage, delphinium, coneflower, and ajuga. It also contains a small blue hibiscus that I planted last Spring along with lamb's ear and a wide variety of sempervivum.

Thursday, April 8, 2010

Chicken Eggs

We love gathering the chicken eggs everyday here on the farm. I love it. Jorene loves it. Liam loves it. Even Hope loves going to the chicken house. It reminds us everyday of our self-reliant life and how healthier our life is by limiting what we buy at the store.

Now that the days have gotten longer and warmer, our egg production is increasing. During the winter, we would usually get 19 - 20 eggs a day. Now I am collecting 22 - 24 eggs a day, and that will increase to about 28 - 30 by summer. The surprise, yesterday, though was a green egg. You can see it on top of the basket, under Hope's nose.

While colored eggs are not uncommon, I cannot identify the chicken who is laying this green egg. I used to have 2 Ameraucanas or Easter Egg Chickens. I thought we had lost both of them last year, one to a predator and one to illness. But, apparently I was wrong. When I look around the hen house, I cannot find a Ameraucana anywhere. So, I don't know who is responsible for this green egg. Strange.

Monday, April 5, 2010

Potatoes in a Bucket

We found this old rusty bucket on a recent walk in the woods. I hated to see it laying in the woods and I thought it would make a great bucket for growing potatoes. For several years, I've grown potatoes in the garden using the straw method. But I thought it would be fun to experiment with growing them in a bucket.


It already had a couple of holes in the bottom, but I drilled more to have adequate drainage. I then put several inches of compost and peat moss.


It's always good to have help around the farm. Liam and Hope helped me put 3 eye pieces of All-Blue, Onaway(White), and Caraway(Red) potatoes in the bucket. We then put about 6 inches of wood shavings over the potatoes. You could also use potting soil or straw. I get the wood shavings for free from a saw mill nearby.

When the plants start to emerge, I'll put cover with more wood shavings to keep the tubers covered. If all goes well, I plan to make red, white, and blue potato chips for Fourth of July.

Sunday, March 28, 2010

Clearing the Land

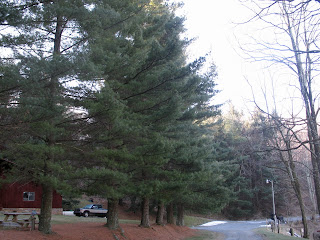
When we first moved into The Ponderosa Lodge, the lodge was surrounded by pine trees. This created a beautiful canopy when driving up to the lodge, but it kept the lodge dark and cool. We were so crowded that we couldn't see cars pull in the driveway and didn't know people were here until they walked up to the door. We, basically, had a 20 minute window of sunlight in the front window when the sun was peaking between the trees. We had to do some clearing.


Pines trees in the front and back in 2005.


We first cut down 7 of the pine trees in the front and 5 large trees in the back. Then we cleared some locust across the driveway. This opened up the lodge and we realized we had a view of the holler below.

Last week, we got 12 more trees removed to increase our view of our fields and open the lodge up for more sunshine. We plan to add solar panels to the roof for hot water and need a little more sunshine.

View from our bedroom window.


Tom attaches a cable to direct the tree's fall.

Tom is a good friend and a great person to know. He has his own wood mill and milled all of the trees we have cut down here into lumber. All of the improvements we have made to the lodge have utilized lumber from our property. We trade lumber with Tom in return for his help in cutting down the trees. He takes the large trunks, while the tops and most of the branches get cut into firewood for my friend Scott. The smallest branches are then hauled to the back edge of our fields for brush piles for wildlife.